Happy Litha, everyone! I must say that I am very happy with the Solstice Giveaway results, and I am very grateful for your generosity. We raised $90.67 bucks in e-tickets (minus Paypal taxes), which will for sure buy a nice present for our young Josie (just need to find how to make it get to her!)
And the winner is...
Susanne Murray, from United Kingdom!! wepeeeeee!! *popping champagne*
Congratulations, Suzanne!! Please contact me at solstitium@gmail.com and let me know which one of the pieces you prefer and how we can arrange shipping.
Drawing was made using The Hat software. People who bought more than one e-ticket were added to the list more than once, with numbers after their names. To the ones who didn't win, my respect and good luck next time -- and a big THANK YOU!
Tuesday, June 22, 2010
... and the winner is...
categories:
Solstice Giveaway
Thursday, June 17, 2010
DIY: cradled masonite boards
No job is perfect, not even the art ones. For me, one of the worse parts of being an artist is having to frame your artwork each time you put them on display. For a very simple reason: I am cheap. And if you are in the art business, you know that a good presentation for your artwork can be very pricey. And if you are an emerging/newbie artist, you may find it a real pain in the pocket. But if you paint small and you are in a show with other dozens of artists, there's no escape, since a good framing will help your work to have the attention it deserves.
1. For this project, I used a size 24' x 30' masonite panel ($3.58) and one 10 feet long wooden strip measuring 3/4 wide and 1/2 deep (about $6.50 each, the most expensive material you'll get.) You'll also need a hammer, a ruler or measuring tape (I prefer the tape), pencil, a hand saw or electric jigsaw (I highly recommend this second one), wood glue (not used by me in this first attempt, but proved useful later), sandpaper, and tiny little nails. And, of course, acrylic gesso and a brush for priming.
2. Cut the wooden strip in four pieces according to the measurement of your panel sides. Top and bottom + two sides. I chose to cut two 24' strips (top and bottom), and two 29' strips for the sides. Since I'm using a 1/2 inch thick strip, I had to take one inch off each side (which measure 30 inches) in order to make the longer strips to fit in the rectangular structure.
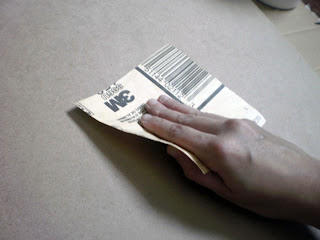
3. Apply the wood glue to stick the strips into place, and reinforce it nailing the corners and borders of the masonite. Three nails in each side will do the trick. Make sure the heads of the nails are not sticking out and the surface is even, and sand off the masonite powder that will accumulate around the nail holes.
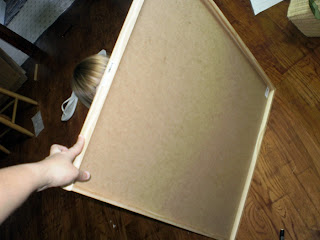
4. Ta-dahhhhh! You are good to go. (But with no blonde little head, sorry. This privilege is mine.)
6. ... and start having fun with the acrylic gesso. I use about three coats, and since I like a smooth surface, I sand between each coat. It will depend on how textured you want it.
8. Also, gesso the sides to make your board uniform and nice-looking. It will also cover imperfections. Here is the board hanging on the wall, ready for the brushes!
I started painting small pieces on paper, now I am evolving to larger sizes on more sturdy surfaces, and loving it. Painting large kind of lessens the need for framing, I guess. For me, this is amazingly liberating. Last week I went to the hardware store and bought some wooden strips for my experiences on cradling my masonite boards, smiling, thinking at all the money I was saving in framing. While working on the boards, I discovered another advantage, even more gratifying: preparing the very surfaces you are going to work on, with your own hands, can be immensely pleasurable and even have a spiritual dimension. Thinking that not only the painting, but the very structure where it is placed, were built by yourself, makes it even more human and infused in energy.
Before starting, I looked for tutorials on the web and found this one, made by artist Amanda Hawkins, which was very helpful. Our process end up being very similar with just a few differences. Here's my own tutorial on how to cradle masonite boards, based on what worked for me. Hope it is useful!
1. For this project, I used a size 24' x 30' masonite panel ($3.58) and one 10 feet long wooden strip measuring 3/4 wide and 1/2 deep (about $6.50 each, the most expensive material you'll get.) You'll also need a hammer, a ruler or measuring tape (I prefer the tape), pencil, a hand saw or electric jigsaw (I highly recommend this second one), wood glue (not used by me in this first attempt, but proved useful later), sandpaper, and tiny little nails. And, of course, acrylic gesso and a brush for priming.
The wooden strip. 3/4 deep is good enough to hang on a wall, but will also fit a regular frame if you client thinks your artwork deserves better.
The masonite board and its 1/8 thickness.
3. Apply the wood glue to stick the strips into place, and reinforce it nailing the corners and borders of the masonite. Three nails in each side will do the trick. Make sure the heads of the nails are not sticking out and the surface is even, and sand off the masonite powder that will accumulate around the nail holes.
4. Ta-dahhhhh! You are good to go. (But with no blonde little head, sorry. This privilege is mine.)
5. Now you can sand your board...
7. You may still see nail holes showing on your board. In such case, more sanding and more gesso until you make it smooth enough.
8. Also, gesso the sides to make your board uniform and nice-looking. It will also cover imperfections. Here is the board hanging on the wall, ready for the brushes!
A cradled masonite board this side, unprimed, is around $35. A simple frame, no matboard, is around $30. What do you think I'd prefer?
Tuesday, June 8, 2010
falling in love.
categories:
acrylics,
experiments,
masonite,
works in progress
this has been odd phase, in which i've been alternating days of lethargy with others of normal activity. a block of sorts. i don't know if the transition to the new materials have been causing this. yesterday i started working in some small works on paper and since then i've been slowly coming back to my normal self.
but anyway... i'm glad to finally share my new experiments on this new surface that brought me much excitenment and a happy sense of artistic enlightenment: the masonite board.
masonite is a type of hardboard much used in construction and furniture. it's light, thin, smooth, and very inexpensive. if you apply coats of gesso on it you'll have a nice surface to play using almost all types of traditional media - including oils, acrylics, pastel, colored pencil, charcoal, and graphite.
acrylic paints keep their vibrancy and look way more alive and luminous on a primed masonite than on canvas. the picture doesn't do the justice: these greens and blues are to die for. unfortunately i am not going to finish this painting; it was supposed to be a depiction of the goddess Isis, but i'm not really feeling it, so the figure will be covered soon. but the background will certainly be reused.
now i have a set of wooden strips resting on the back porch, destined to become cradles for other boards. i'll spend some time measuring, cutting and sanding them, but when i think about the money i'll save, the extra job just makes me smile: no need to frame the pieces, not mentioning that buying the boards already cradled are amazingly expensive. i'll report all the process of preparing the boards as soon as i get started.
+
I'd like to thank all the people who's been buying e-tickets for the Solstice Giveway. i feel really joyous. God bless you all.
but anyway... i'm glad to finally share my new experiments on this new surface that brought me much excitenment and a happy sense of artistic enlightenment: the masonite board.
masonite is a type of hardboard much used in construction and furniture. it's light, thin, smooth, and very inexpensive. if you apply coats of gesso on it you'll have a nice surface to play using almost all types of traditional media - including oils, acrylics, pastel, colored pencil, charcoal, and graphite.
it takes a little time to prepare it, since you have to sand and prime (acrylic gesso) and sand a little more between coats, but it's well worth the effort. for my particular technique, i think it was the perfect find, since it allowed me to do my pencil work just the way i like it without cursing the texture. by the way, the texture is something else you can create according to your needs. pencil won't erase well, but a moist rag or paper towel will do the trick.
acrylic paints keep their vibrancy and look way more alive and luminous on a primed masonite than on canvas. the picture doesn't do the justice: these greens and blues are to die for. unfortunately i am not going to finish this painting; it was supposed to be a depiction of the goddess Isis, but i'm not really feeling it, so the figure will be covered soon. but the background will certainly be reused.
now i have a set of wooden strips resting on the back porch, destined to become cradles for other boards. i'll spend some time measuring, cutting and sanding them, but when i think about the money i'll save, the extra job just makes me smile: no need to frame the pieces, not mentioning that buying the boards already cradled are amazingly expensive. i'll report all the process of preparing the boards as soon as i get started.
+
I'd like to thank all the people who's been buying e-tickets for the Solstice Giveway. i feel really joyous. God bless you all.
Subscribe to:
Posts (Atom)


